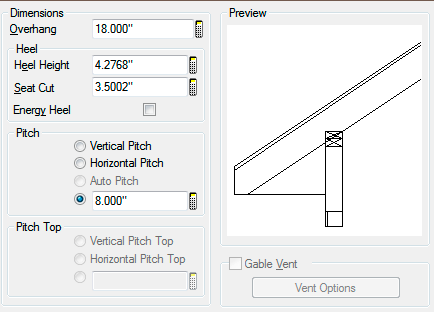
The Heel Height is the vertical measurement from the outside top of a plate or beam to the top of the rafter. The heel height measurement is very useful in SoftPlan but it can also give you fits if you try editing it individually on a roof edge.
If you follow proper procedure you can have your fascias match exactly as you go around the house no matter what the pitch changes are and you can do so without touching the heel height.
To fully understand heel heights you need to understand what SoftPlan does when you change the pitch of the roof. When you change the pitch the roof plane rotates. The point of rotation is at the very top outside of the fascia. It does not rotate at the wall as you might expect. In other words, the fascia stays exactly where it was and everything else changes. So as a result when you change the pitch the heel height automatically adjusts up or down depending on which direction you are changing the pitch. You can watch this happen in the little roof graphic as you change the pitch.
Adjusting the overhang will also adjust the heel height. This is because adjusting the overhang simply moves the fascia horizontally in or out. Since the top of the fascia remains at a constant elevation the heel height adjusts up or down. Again this can be observed in the roof graphic.
So, by adjusting the pitch and then adjusting the overhang you will maintain the tops of all your fascias to be at exactly the same elevation.
If you attempt to adjust the heel height you will end up with different fascia elevations because you will be moving the whole roof plane up or down, including the fascia.
Note that the seat cut setting was introduced in V2012. |
For a bastard roof, a roof with different pitches on different planes, I first determine which pitch is the steepest. For instance I might have some parts of the roof at 12 : 12 pitch and other parts at 9 : 12 pitch. I will then determine what I want my minimum overhang to be. Say for instance I want the overhang to be a minimum of 12". I would set the roof options to be 12" pitch and 12" overhang. I would set the seat cut to an appropriate dimension such as 3.5" for a 2x4 wall or 5.5" for a 2x6 wall, assuming that this is not too deep for the desired rafter size. The entire roof is now created with these settings. Note that the seat cut setting was introduced in V2012. If you are using V14 or earlier you would adjust the heel height and watch the roof graphic to get an approximate seat cut.
Now I want to change some pitches to 9 : 12. I edit the appropriate edges and set the pitch to 9. You will see that the fascia remains in place and that the heel height decreases. Since I do not want my heel height this low I will edit the overhang until I get an appropriate heel height. I now have a bastard roof and all the fascias are at the same elevation.
If at some point your fascias get off and you have different fascia elevations as you go around the house you can easily correct this. Just edit one of the edges of the roof that are set up correctly and note the TOP to Fascia measurement. Close the edit edge dialog box and edit the entire roof by selecting somewhere in the middle of the roof. Edit the TOP to Fascia measurement to be the same as the measurement you previously noted. All of your heel heights will be adjusted to the proper distance.
Bill is the owner and maintainer of SoftPlanTuts.com

