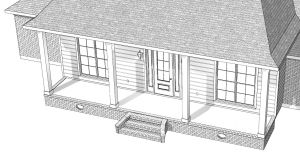
Drop Brick Ledge
Drawing a Drop Brick Ledge
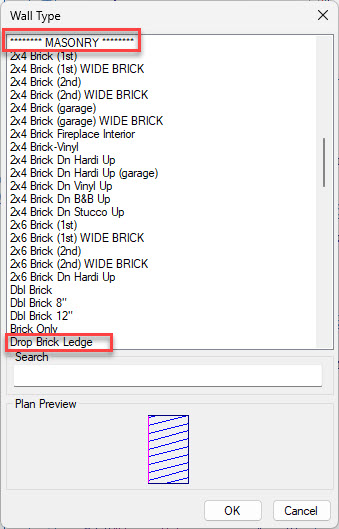
The Drop Brick Ledge can be drawn using a special "Drop Brick Ledge" wall created just for this purpose. The wall is located at the end of the list in the Masonry section of the walls. By default the wall is 1'-11.25" tall. This is the same height as the 3 step brick steps.
Note: Take the following steps if you do not have the Drop Brick Ledge wall in your wall list.
- Verify that you have your drawing set to use the CTH STD Drawing Template.
- Reset your Drawing Templates so that you have the latest walls and settings.
Before drawing the walls, first determine what steps are to be used. Insert the steps in your drawing and edit the steps. Make note of the height of the steps. The height of the drop brick ledge wall will be equal to the hight of the steps. For example, if the steps are 1'-11.25" tall then the wall will also be 1'-11.25" tall.
Also take note of the offset down for the steps. For the standard 3 brick steps the offset would be offset down 2'-2.75". The offset for other size steps will vary. Use this same offset when offsetting the drop brick ledge walls in the steps below.
Follow these steps for creating the Drop Brick Ledge.
- Trace the Drop Brick Ledge wall outside and around the front porch.
- Edit one of the walls and set the Offset Down to match the steps offset, set to Hidden, and turn Cleanup off.
- Use Repeat Edit to make the same changes to the other 2 walls.
- Move the walls into place so that the outside of the wall aligns with the porch lines.
- Adjust the ends of the walls so that they touch the foundation of the house.
- Switch to Foundation Mode and adjust the front porch concrete so that it is 5 1/2" inside the porch lines.
Adding Brick Steps
Inserting the steps
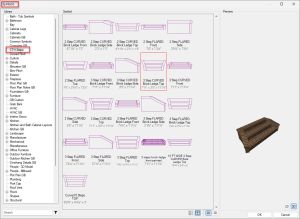
The brick steps are symbols that can be found at Symbols/CTH Steps.
The plan view steps have the word "Top" in their names and they also have a 3D model of the steps linked to them.
The Front and Side view steps can be used to draw the steps in elevation. These are the same views of the steps you would get after generating an elevation which contained the Top version of the steps.
Types of Steps
There are 4 basic types of steps in the CTH Steps library
- Curved with brick ledge
- Curved without brick ledge
- Flared with brick ledge
- Flared without brick ledge
Step selection will be based on the requested type, curved or flared, the number of steps, and whether or not there is a brick ledge.
Railings
Code requires that porches and steps over 24" high must have railings. This presents a challenge for the steps since they are not actually stairs in SoftPlan but are in fact symbols.
If a plan comes in requesting brick steps of a height higher than 24" be sure to point out that the steps and porch will require railing and verify that the customer is aware of the added expense before proceeding.
Pad and Structural Details
Location of the Details
When inserting a set of brick steps you must also insert the structural details for the steps selected. These details can be found at G:\Shared drives\Drafting\SP-2022-libraries\COMPONENTS\Porch
How to Place the Details
Method 1
One way to insert the details is to first make a copy of the details into the project. Then you can simply drag the details onto the Plan Set Page.
Method 2
Another way is to right click the name of the Plan Set Page and select Add Drawing. Browse to G:\Shared drives\Drafting\SP-2022-libraries\COMPONENTS\Porch and select the detail. The detail will be inserted into the center of the page. Note that this method creates a link to the detail rather than a copy of it. If any changes are made to the detail in the COMPONENTS, those changes will be reflected in the detail on the page.
Label and Scaling
Once the detail has been placed on the page you must edit it and turn off the label. Verify that the detail is at 1/4" scale. Then move the detail to a location on the page with enough room for the detail.
Where to Place the Details
In the Plan Review set of the plans place the Structural Details on the ELEV 2 page, the page with the side elevations.
In the Final set place the Structural Details on the FOUNDATION page. On rare occations there may not be enough room for the details on the FOUNDATION page. If that is the case then place it on the ELEV 2 page and make a note on the FOUNDATION page indicating where to find the details for the steps..
Adding Decorative Vents
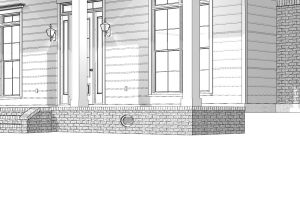
For the decorative vents use a "Vent" opening.
In the Openings\Vent library select the Round 18D vent. Place it in the Dropped Brick Ledge wall, centered with the window.
Make the followng adjustments:
- Width: 1'-4"
- Height: 10"
- Offset: 6" fom bottom of wall to bottom of vent.
The offset is assuming the normal 2'-2.75" drop brick ledge height. Adjust the offset accordingly for other heights so that the vent is approximately centered in the height of the wall.


